Smart Speech Mic
Smart Speech Mic turns any smartphone into a wireless microphone for Murmure. No app installation required on the phone - just scan a QR code.
How It Works
- Murmure starts a secure local HTTPS server on your computer
- A QR code is displayed in the app
- You scan the QR code with your phone's camera
- Your phone opens a web page that streams audio to Murmure over WebSocket
- Murmure uses the phone audio as its microphone input
Setup
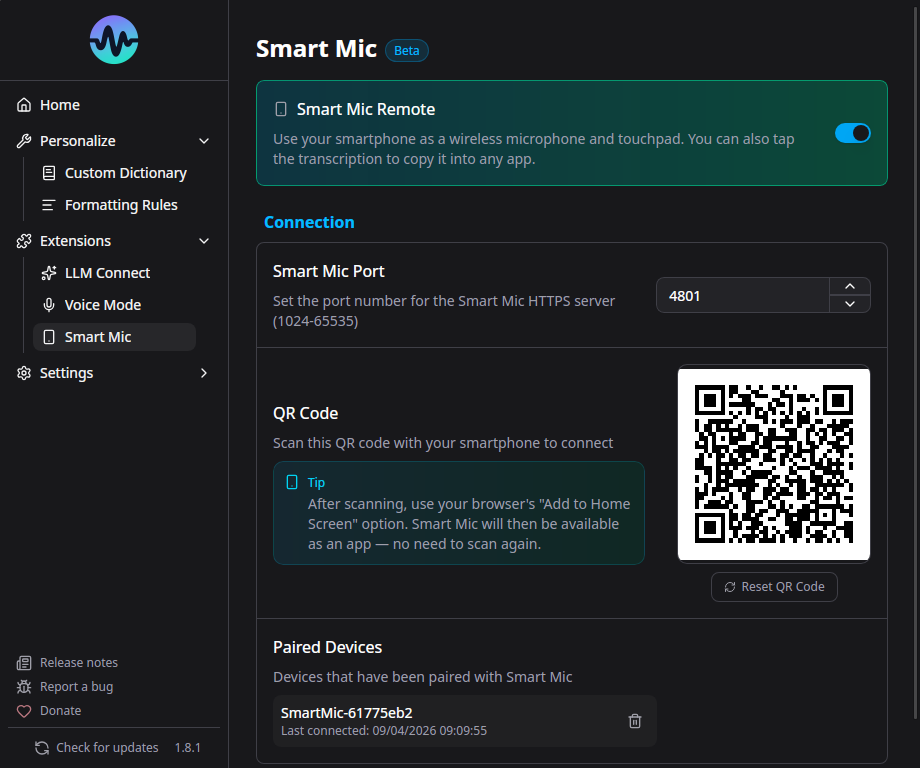
- Go to Extensions > Smart Speech Mic
- Enable Smart Speech Mic
- A QR code appears on screen
- Scan it with your phone (both devices must be on the same network)
- Allow microphone access in your phone's browser
- Start recording in Murmure as usual
Phone Views
The phone web interface has three tabs at the top, each offering a different way to use Smart Speech Mic. The active view is remembered between sessions, so the phone re-opens on the last tab you used.
Remote
The default mode. Your phone acts as a wireless microphone and remote control for Murmure:
- The REC button streams your voice to the computer and pastes the transcription into the focused text field
- The trackpad controls the mouse pointer (tap to click, long-press for right-click)
- The Enter and Backspace buttons send keyboard events to the computer
Use this mode for hands-free dictation when the text should appear directly in a computer application.
Transcription
A chronological log of transcriptions displayed on the phone. Useful when you want to read or share what has been dictated without sending it to a specific application on the computer.
- Each transcription is time-stamped
- Tap any entry to copy its text to the phone clipboard
- Use Copy all to copy the full history at once
- The three-dot menu lets you clear the history
Translation
Bidirectional translation between two languages, displayed as chat bubbles. Pick the language pair at the top of the view, press REC, and speak. Each utterance is detected, translated, and displayed in the appropriate bubble side.
- The selected language pair is persisted between sessions
- Messages from each language appear on opposite sides of the conversation
- A pulsing bubble indicates a translation in progress
The phone web interface is available in several languages and follows the language of the phone's browser (you can also force one via the ?lang= URL parameter).
Requirements
- Both devices must be on the same local network (Wi-Fi)
- Your phone needs a modern browser (Chrome, Safari, Firefox)
- Microphone permission must be granted in the phone browser
Security
- Communication is encrypted via TLS (HTTPS + WSS)
- Self-signed certificates are generated locally
- Device pairing uses tokens stored in your system's native keyring
- No data leaves your local network
Managing Paired Devices
You can view and remove paired devices in the Smart Speech Mic settings. Removing a device revokes its pairing token.
Configuration
- Port: The server port can be changed in settings if the default conflicts with another service
- Bind address: In Advanced Settings, choose which network interface the Smart Mic server listens on. Leave it on Auto (default) in most cases, or pick a specific IP to force traffic through a particular interface (VPN, dedicated LAN, etc.)
- Enable/Disable: Toggle the Smart Mic server on/off as needed
Remote Access
By default, Smart Speech Mic works on your local network. For remote access (from a different network, mobile data, etc.), you can configure a relay in Advanced Settings.
Option 1: Cloud Tunnel (Personal)
For personal use, Cloudflare Tunnel is the simplest option. It creates a secure outbound connection from your computer to Cloudflare's network, giving you a public URL without opening any ports.
Step 1: Install cloudflared
Download the binary for your platform from the official Cloudflare downloads page.
Step 2: Start the tunnel
The --no-tls-verify flag is required because Murmure uses a self-signed certificate for its local server.
You will see output like:
+--------------------------------------------------------------------------------------------+
|  Your quick Tunnel has been created! Visit it at (it may take some time to be reachable):  |
|  https://random-name-here.trycloudflare.com                                               |
+--------------------------------------------------------------------------------------------+
Step 3: Configure Murmure
- Copy the generated URL (e.g.,
https://random-name-here.trycloudflare.com) - Open Murmure > Smart Speech Mic > Advanced Settings
- Paste the URL into the Relay URL field
- Leave Machine ID disabled (it is not needed for personal use)
- Scan the QR code from your phone on any network (4G, another Wi-Fi, etc.)
The tunnel stays active as long as the cloudflared command is running. Close it with Ctrl+C when you are done.
Warning
When using a cloud tunnel, your audio data transits through the tunnel provider's servers (Cloudflare in this case). For sensitive data, use a self-hosted solution (Option 2) instead.
Option 2: FRP Tunnel (Enterprise / Self-hosted)
FRP (Fast Reverse Proxy) is a self-hosted tunneling solution suited for organizations that want full control over where audio data flows. frps runs on a VPS you own, and frpc runs on each workstation running Murmure. FRP acts as a transparent TCP relay: the phone connects to the VPS on a public port, and the raw bytes are forwarded through the tunnel to Murmure. TLS is handled end-to-end by Murmure itself, using its self-signed certificate.
Prerequisites:
- A VPS with a public IP address
- Port 7000 open on the VPS firewall (frpc-frps tunnel)
- Port 4443 open on the VPS firewall (phone connections)
- A domain or subdomain pointing to the VPS (e.g.
mic.yourdomain.com) — optional, the public IP works too
Architecture:
Phone (any network)
    |
    | HTTPS (port 4443) — Murmure's self-signed certificate, end-to-end
    v
VPS: frps   <-- transparent TCP relay, does not touch TLS
    |
    | TCP tunnel (port 7000)
    v
Workstation: frpc
    |
    | HTTPS (port 4801)
    v
Murmure Smart Mic server   <-- TLS originates here
Ports involved:
- 4801 — Murmure's local Smart Mic server (
localPortin frpc). Never changes. - 7000 — FRP control tunnel between frpc and frps (
bindPorton the VPS,serverPorton the workstation). This is FRP's default; it has nothing to do with Murmure and can be changed freely as long as both sides match. - 4443 — public port on the VPS where the phone connects (
remotePortin frpc). A non-privileged port (above 1024) avoids two common problems with port 443: it is frequently occupied by an existing web server on a VPS, and binding it requires running frps as root or grantingcap_net_bind_service.
Certificate warning on first scan
Because Murmure uses a self-signed certificate, the phone browser will display a security warning when you scan the QR code for the first time. Accept it manually to continue. This is expected behavior with this setup.
Step 1: Install FRP on both machines
Download the latest release for your platform from the FRP releases page. Choose the archive matching your OS and architecture (e.g. frp_0.69.1_linux_amd64.tar.gz for a Linux VPS, frp_0.69.1_windows_amd64.zip for a Windows workstation).
Each archive contains both the frps and frpc binaries.
Step 2: Configure frps on the VPS
Create /etc/frp/frps.toml:
Start frps:
Open the ports on the VPS firewall
This step is easy to forget and will make the proxy unreachable if skipped. Open both ports on the VPS:
Adapt the commands to your firewall tool (firewall-cmd, iptables, cloud security groups, etc.) if not using ufw.
Step 3: Configure frpc on the workstation
Create frpc.toml on the machine running Murmure:
serverAddr = "mic.yourdomain.com"
serverPort = 7000

auth.method = "token"
auth.token = "your-shared-secret"

[[proxies]]
name = "murmure-smartmic"
type = "tcp"
localIP = "127.0.0.1"
localPort = 4801
remotePort = 4443
The proxy type is tcp: FRP forwards raw bytes between the phone and Murmure without any TLS processing. Murmure's self-signed certificate reaches the phone intact.
Start frpc:
Step 4: Configure Murmure
- Open Murmure > Extensions > Smart Speech Mic > Advanced Settings
- Enable Relay mode
- Set the Relay URL to
https://mic.yourdomain.com:4443 - Leave Machine ID disabled
- Restart the Smart Mic server (disable then re-enable Smart Speech Mic)
- Scan the new QR code from your phone on any network — accept the certificate warning when prompted
Warning
Audio data transits through your VPS. Keep the FRP auth token secret and restrict access to the VPS accordingly.
Multiple workstations
With a TCP proxy, workstations are differentiated by port, not by URL path. Each workstation runs its own frpc instance with a unique proxy name and a unique remotePort on the VPS. frps.toml does not change.
Example with two workstations:
Workstation A — frpc.toml:
serverAddr = "mic.yourdomain.com"
serverPort = 7000

auth.method = "token"
auth.token = "your-shared-secret"

[[proxies]]
name = "murmure-workstation-a"
type = "tcp"
localIP = "127.0.0.1"
localPort = 4801
remotePort = 4431
In Murmure on workstation A, set Relay URL to https://mic.yourdomain.com:4431.
Workstation B — frpc.toml:
serverAddr = "mic.yourdomain.com"
serverPort = 7000

auth.method = "token"
auth.token = "your-shared-secret"

[[proxies]]
name = "murmure-workstation-b"
type = "tcp"
localIP = "127.0.0.1"
localPort = 4801
remotePort = 4432
In Murmure on workstation B, set Relay URL to https://mic.yourdomain.com:4432.
localPort is always 4801 on every workstation — that is Murmure's local port, leave it unchanged. What must be unique per workstation is remotePort on the VPS, along with the proxy name.
Open each remotePort on the VPS firewall
Each port must be explicitly opened, otherwise the phone cannot reach that workstation:
Proxy names must be unique across all frpc instances connecting to the same frps.
Note
Machine ID does not apply to this TCP setup. FRP forwards raw bytes and does not strip path prefixes, so the /{machine-id}/ prefix added by Murmure would reach the server as-is and cause a 404 error. To route multiple workstations under a single URL using Machine ID, see Option 3.
Option 3: Reverse Proxy with Machine ID (Enterprise)
This option covers multiple Murmure workstations on an internal network, all accessible under a single public URL, differentiated by Machine ID. A reverse proxy (Nginx or Caddy) sits on the internal network and routes each request to the correct workstation based on the path prefix added by Murmure's Machine ID feature.
Architecture:
Phone (any network)
    |
    | HTTPS (port 443) — valid certificate, no browser warning
    v
Reverse proxy (internal network, public-facing)
    |  strips /{machine-id}/ prefix, routes by machine name
    |
    +-----> cabinet-1.internal.example.com:4801 (Murmure workstation 1)
    +-----> cabinet-2.internal.example.com:4801 (Murmure workstation 2)
    +-----> ...
On each Murmure workstation:
- Enable Relay mode
- Enable Machine ID and set a unique value (e.g.
cabinet-1) - Set Relay URL to the proxy's public URL (e.g.
https://mic.example.com) — no port, no path - Restart the Smart Mic server
The QR code will then encode https://mic.example.com/cabinet-1/?token=....
On the reverse proxy:
Path prefix stripping is required
Murmure's routes (/, /ws, etc.) are all at the root. The reverse proxy must strip the /{machine-id}/ prefix before forwarding the request, otherwise Murmure returns a 404. WebSocket upgrade headers must also be forwarded.
Example Nginx configuration:
server {
    listen 443 ssl;
    server_name mic.example.com;
    # Valid TLS certificate here (e.g. Let's Encrypt via Certbot)

    location ~ ^/(?<machine>[^/?]+)(?<rest>/.*)?$ {
        proxy_pass https://$machine.internal.example.com:4801$rest;
        proxy_ssl_verify off;            # Murmure uses a self-signed certificate internally
        proxy_http_version 1.1;
        proxy_set_header Upgrade $http_upgrade;
        proxy_set_header Connection "upgrade";
        proxy_set_header Host $host;
    }
}
The regex captures the machine ID from the path, resolves it to the corresponding workstation via internal DNS (cabinet-1.internal.example.com), strips the prefix by passing only $rest to proxy_pass, and forwards WebSocket upgrade headers.
Note
Because the reverse proxy presents its own valid certificate (e.g. Let's Encrypt), the phone browser shows no certificate warning — unlike Option 2.
Token Expiration
In Advanced Settings, you can set a Token expiration (in hours). When set, paired devices are automatically revoked after the specified duration. Set to 0 for no expiration (default).
This is useful in shared environments (hospitals, shared workstations) where sessions should be time-limited.